
We tackled our basement floor this weekend. Actually, we started tackling it last weekend but then we had to go back to our day jobs (which included traveling for me) so weekend warriors we are (for the time being).
 This floor was hideous when we bought the house. It had a nice blend of cat-scratch-post carpet and 12×12 snooze-fest ceramic tile. This level of the house (which isn’t really a basement as this is the truest of split-level homes) is going to be where the boys hang out most of the time. This room is going to be the Media Room and to the right is a room that will be Drew’s office/guest room (we are building a Murphy Bed in there…will definitely be posting on that), the Laundry Room and a full bath. The door to the garage is just off this room as well.
- Removal of old flooring – the carpet was easy, the tile not so much.
 I googled “removing ceramic tile from slab floor” and found lots of postings about applying heat and then hammering the heck out of it to break it up. So I grabbed the heat gun (we thankfully have pretty much one of EVERYTHING) and went to work. And 45 minutes later, this was as far as I’d gotten. Literally. I got 1/2 a tile off in 45 minutes. I calculated it would take me about 6 days around the clock to keep using this method so I called Drew and told him to come up with a Plan B.
 Plan B worked waaaaaayyyyyy better. We rented this jackhammer from Home Depot and went to town. Thankfully Drew thought to buy earplugs and face masks when he picked it up. We rented it for 4 hours at 7:00 pm and the guy told us to have it back at 9:00 am the next morning so we went at it late into the night. (I highly recommend opting for the 4 hour rental price after 6:00 pm as you can work overnight and save a lot of money!)
 - Leveling the jackhammered floor – so while using the jackhammer was much easier, it also left the floor looking like a hot mess.
 So we had to level it which was basically dumping buckets of this on the floor and leveling it with a smooth trowel. Drew thought it was kind of fun, I thought it was boring. In the end, it looked like this. (Ignore that weird peach wall in the back – it’s going to be a super cool wall of bookshelves/TV awesomeness soon).
- Picking the new floor – easier said than done. When we started talking about flooring, I knew I didn’t want carpet. I loathe carpet. No idea why but I would prefer not to do it in any room ever, but I conceded to allowing it in the bedrooms.
 We thought about hardwood (which is what is in the main level Great Room and Kitchen) but we had also just recently completed a master bathroom renovation in our old house with these wood-style tiles and I loved it. Here’s what we did in that room. I love it (and I am definitely going to miss that awesome bathroom…sigh).
I had read a blog about better pricing at “mom & pop shops” but clearly the person that wrote that was dreaming as the “local” shops I visited had pricing 3 times what we ended up paying. I wanted a rustic look in larger sizes and it was $5.99/sf which in this 700 sf space would have killed my budget. Home Depot had something I liked but only in 24″ and I found exactly what I wanted at Lowes for only $2.49/sf – SCORE. It was on clearance as they had just discontinued it so I nabbed 58 boxes (at 50 lbs each – I am sooooo sore this morning) and off we went.
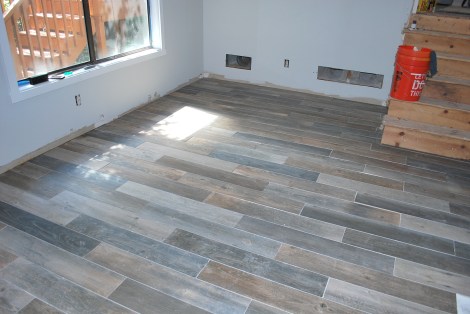
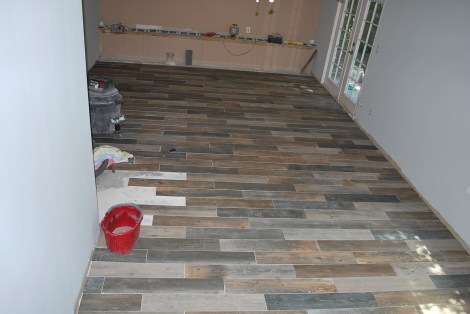
It was a long day, but I could not be happier with the results! This is what it looks like now – I cleaned it yesterday and we still have to grout it but Drew’s knee was swollen stiff from laying all of this tile the day before so we took the day off from grouting (and painted ceilings and walls and removed carpet instead). He also had to do more leveling as we started to see a slope toward the hall and decided to hold off on forcing the tile in. It’s taking more time than we thought, but with results this awesome, I don’t mind the wait.

This is amazing, Kari! I feel like I’m watching the HGTV shows!!! So happy to know you and that you have a passion for this! 🙂
LikeLike